在bash中输入
-i 可以开放外部网路访问,若去除该选项,则只能本机localhost访问.
-p 8000可以用来设置端口,默认端口为4000.
jupyter默认配置文件为~/.jupyter/jupyter_notebook_config.py
若有多种配置需求如端口,启动路径,密码,是否允许远程访问,则可以将jupyter_notebook_config.py复制一份进行修改,随后重命名或者放置到其他目录。为了方便管理,可以修改名字,如jupyter_notebook_config_remote.py,启动jupyter命令为
jupyter-notebook --config='~/.jupyter/jupyter_notebook_config_remote.py'. 而默认的配置依旧可以使用jupyter-notebook启动.
更新系统至windows v2004版本之后,在非Windows系统目录(即非/mnt)打开vscode会提示错误,需要手动前往\\wsl$\Arch\mnt\c...之类的目录用vscode打开. 在wsl系统下输入code \\wsl$\Arch\mnt\c...也会同样报错。
解决此问题,只需要进入Windows系统目录,再执行code //wsl$/Arch/home/yfs/...即可。命令如下:
1
| alias code='result=$(pwd | grep "mnt");if [[ $result ]];then code .;else a=`pwd` && cd /mnt/c/ && code "//wsl$/Arch$a"&& cd $a;fi'
|
- 先判断当前目录是否包含mnt,若包含,则为windows目录环境,直接code即可;
- 若为wsl系统目录,先记录当前目录,随后进入windows目录,code打开映射的wsl路径,随后返回原目录。
Tips:1
| linux环境下,alias 的优先级高于$PATH.
|
此文档不是用于离线安装jupyter,而是解决jupyter因网络问题无法正常显示图像的问题。
修改文件:~ /.jupyter/jupyter_notebook_config.py
定位到 c.NotebookApp.extra_static_paths 这一行,修改为
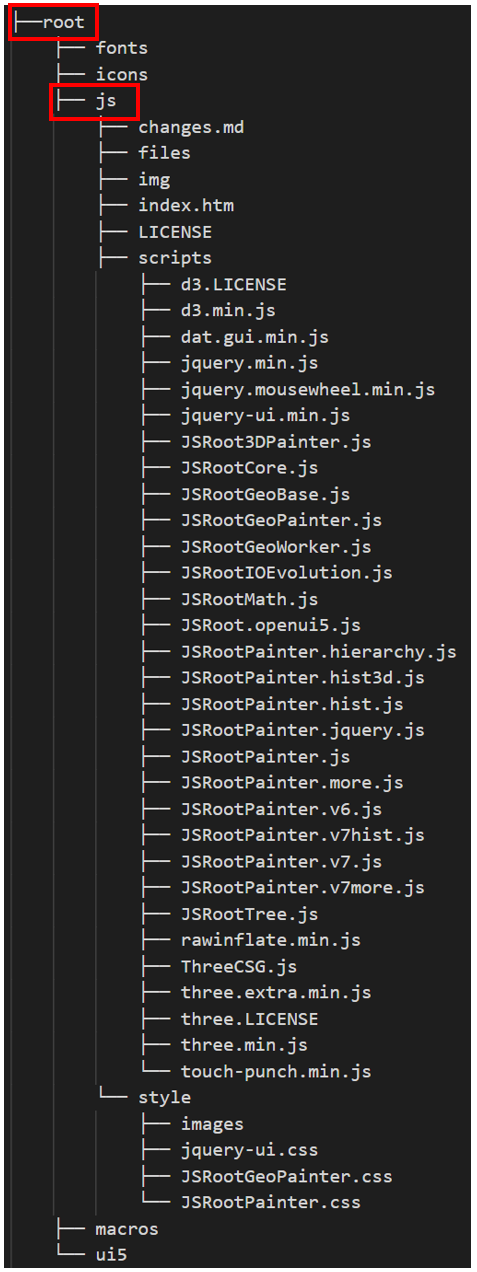
c.NotebookApp.extra_static_paths = ['/usr/share/root/js']
其中'/usr/share/root/js' 根据root安装的目录来确定.

可以通过find命令来确定该路径.
系统中只存在python环境而没有jupyter环境可用,希望python能够直接执行jupyter脚本(*.ipynb)文件,并将结果返回(同时输出到*.ipynb脚本和终端).
下载地址
1
2
3
4
5
6
7
8
9
10
11
12
13
14
15
16
17
18
19
20
21
22
23
24
25
26
27
28
29
30
31
32
33
34
35
36
37
38
39
40
41
42
43
44
45
46
47
48
49
50
51
52
53
54
55
56
57
58
59
60
61
62
63
64
65
66
67
68
69
70
71
72
73
74
75
76
77
78
79
80
81
82
83
84
85
86
87
88
89
90
91
92
93
94
95
96
97
98
99
100
101
102
103
104
105
106
107
108
109
| #!/usr/bin/python3
import sys
import json
import os
class tovar():
"""重定向python的输出至变量
print()函数实际上是 sys.stdout 函数,默认输出到终端。
这里将print()函数重定向到变量
Attributes:
str: 用于存储print函数输出的结果
"""
def __init__(self):
"""
初始化函数,必备函数
"""
self.str=''
def write(self,s):
"""
将print的值暂存到str,如果多次print,则值会累加,必备函数
"""
self.str+=s
def flush(self):
"""
清空str,必备函数
"""
self.str=''
def content(self):
"""
返回str,将暂存的输出返回到变量中
"""
return self.str.rstrip()
def writecode(s,mode='update'):
"""
update模式时,为累加模式
recreate模式时,重写模式
"""
if mode == 'recreate':
w='w'
else:
w='a'
fout = open('tmp.py',w,encoding='utf8')
fout.write(s)
fout.close()
# 获得要转化的jupyter文件
filename=sys.argv[1]
# jupyter文件格式实际上是json格式,选择自带的json库来读取,读取后关闭文件
file=open(filename)
data=json.load(file)
file.close()
cells=data['cells']
# 命令单元格的id,必须设置,否则不会显示执行结果
id=1
# term暂存,为输出到终端,随后将print重定向到变量var
var=tovar()
term=sys.stdout
sys.stdout=var
for cell in cells:
cell_type=cell['cell_type']
# 单元格为markdown时,不需要处理,打开jupyter文件会自动转换
if cell_type=='markdown':
continue
else:
# 当jupyter清空了所有输出时,execution_count为null,如果不设置id的话,即使
# 有执行结果,在jupyter中也不会显示。
cell['execution_count']=id
# 将print重定向到终端,以便在终端输出进度,随后重定向到变量
sys.stdout=term
print('process: %d/%d' %(id,len(cells)-1))
sys.stdout=var
id+=1
codes=cell['source']
#新建代码单元格存储文件
writecode('','recreate')
for code in codes:
# 修正jupyter中一些magic code
if 'matplotlib inline' in code:
code='import matplotlib.pyplot as plt\n'
# 逐行写入code cell的代码到文件中
writecode(code)
# 执行代码单元格代码,这种形式执行的好处在于,等价于直接把代码拷贝到主程序中,
# 程序变量等信息保留。由于此时print重定向到tovar函数的str变量中,并不会在终端输出信息。
exec(open('tmp.py').read())
# 获取代码运行的结果
result=var.content()
# 清空缓存,以便于存储下一次结果
var.flush()
# 代码运行为空跳过
if(result.strip()!=''):
# 这一点用来判定原jupyter是否有输出,如果没有输出,则需要新建dict,否则只需要替换
# 相应部分既可以。
if len(cell['outputs'])==0:
out={}
out['name']='stdout'
out['output_type']='stream'
out['text']=[res + '\n' for res in result.split('\n')]
cell['outputs'].append(out)
else:
cell['outputs'][0]['name']='stdout'
cell['outputs'][0]['output_type']='stream'
cell['outputs'][0]['text']=[res + '\n' for res in result.split('\n')]
# 在终端中输出
sys.stdout=term
print(result)
# 每运行一次code cell,修改jupyter文件
file=open(filename,'w')
json.dump(data,file)
file.close()
|
